# Project Details
# Project List
TIP
You need project app rights to access the sections described in this documentation.
You can access the project list here (opens new window). This is the landing page where the project team can see a list of all projects that are currently running and Archived Projects .

From this page you can view project details, including milestones and tasks.
Action button from the project list page will allow you to do the following:
- Create new project
- Access project details
- Print project report
- Edit project details
- Duplicate project
- Delete a project
- Archive project
# Create new Project
Click on the "create new project" button at the top of the page, you will be routed to a new page where you will be required to enter the following information to create a new project:
| Field |
|---|
| Project Title |
| Client associated with the project |
| Project Start Date |
| Project end date |
| Project description |
| Scope of work |
| Deliverables for the project |
TIP
When you create a new project, you will be automatically assigned as the project manager, owner for the project files docs, details etc.
# Edit Project
To edit an existing project, start at the project list page (opens new window), look for the project you want to edit. Click on the action column for that project and click - edit. You will be taken to an edit page, where you will be able to edit the details you need to edit for the project.
# Print Project Report
To view project details, start at the project list page (opens new window), look for the project you want to view. Click on the action column for that project and click - project report. You will be navigated to the project report page to view the PDF report, which will look like this:
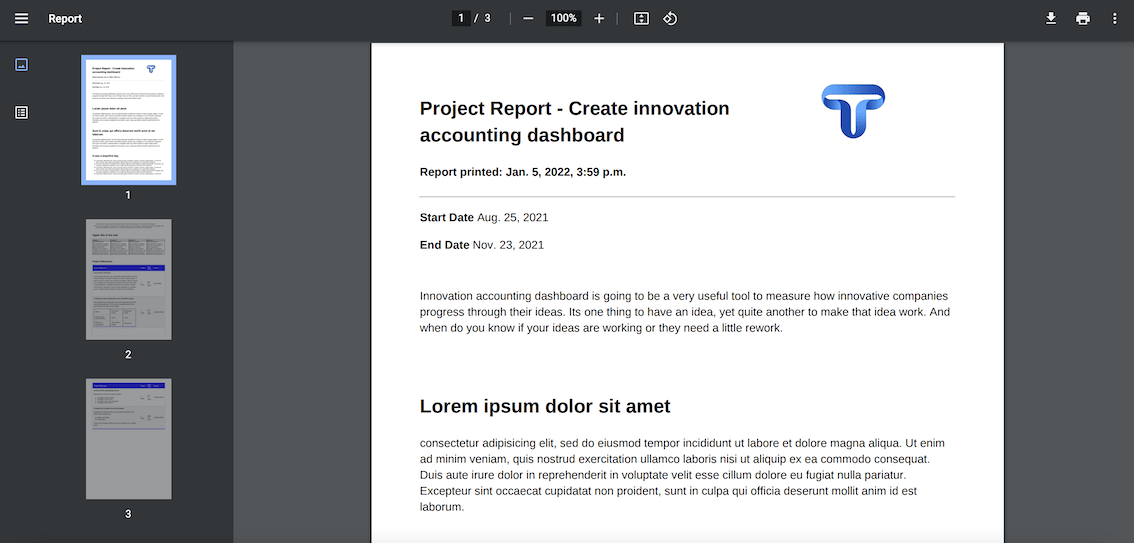
The project report includes all the information entered for a specific project, from the description to the milestones and tasks in one convenient PDF document that you can print, or share with others.
# Project Details
To view project details, start at the project list page (opens new window), look for the project you want to view. Click on the action column for that project and click - view project. You will be navigated to the project detail page for that project, which will look like this:
Within the project detailed page, there are five (5) project tabs. Each tab contains a set of data that is relevant to the project. These tabs are:
- Project Milestones - where you can define the different milestones for the project in a chronological order.
- Project board - where you can add specific project tasks, associated with milestones
- Project meetings - where you can record all meetings associated with the project
- Project documents - where you can save all project docs
- Project notes - keep track of all notes associated with the project
# Project Budget
As a project manager, the first order of business will be to set up your project budget, that can be done in two steps:
- Set up project resources
- Set up project accounts
# Project Resources
Project resources represent the individuals that will be working on the project. Before assigning project resources, the individuals must be added to Skhokho as team members and assigned "Project App Access".
TIP
Ensure that the cost rate for your resources have been set up. They can only be set up by the Human Resources team (from inside the HRMS app). If you do not see a resource cost on this page - please contact HR to set-up payroll.
To add a resource click on the "add resource" button at the top of the page:
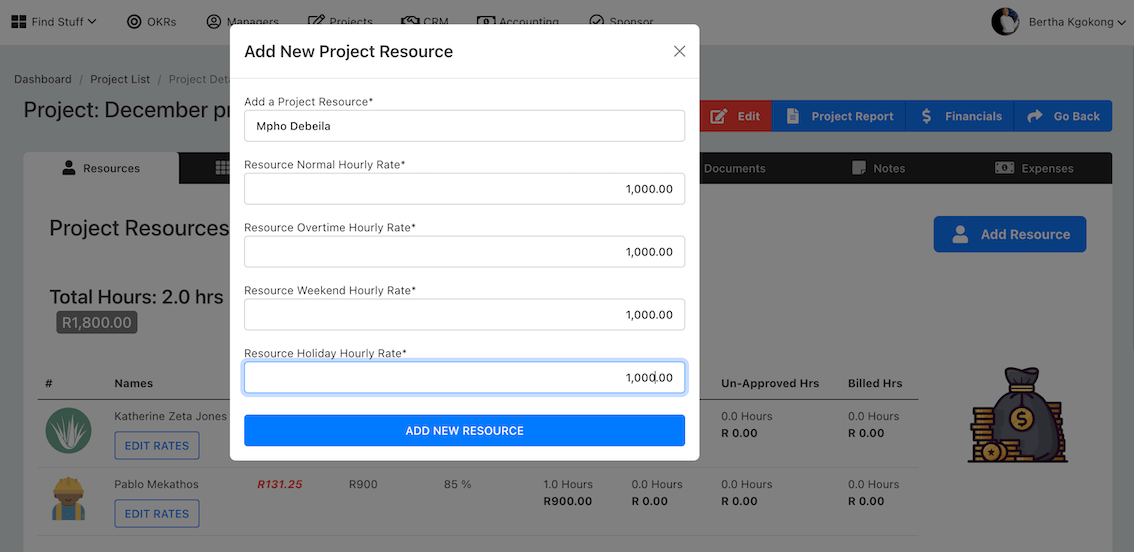
Select the resource from the list and then enter the: (1) Normal Hourly Rate, (2) Overtime Hourly Rate, (3) Weekend Hourly Rate and (4) Holiday Hourly Rate. When employee book hours to the project, the rates you enter here will be used to calculate the value that should be billed to clients.
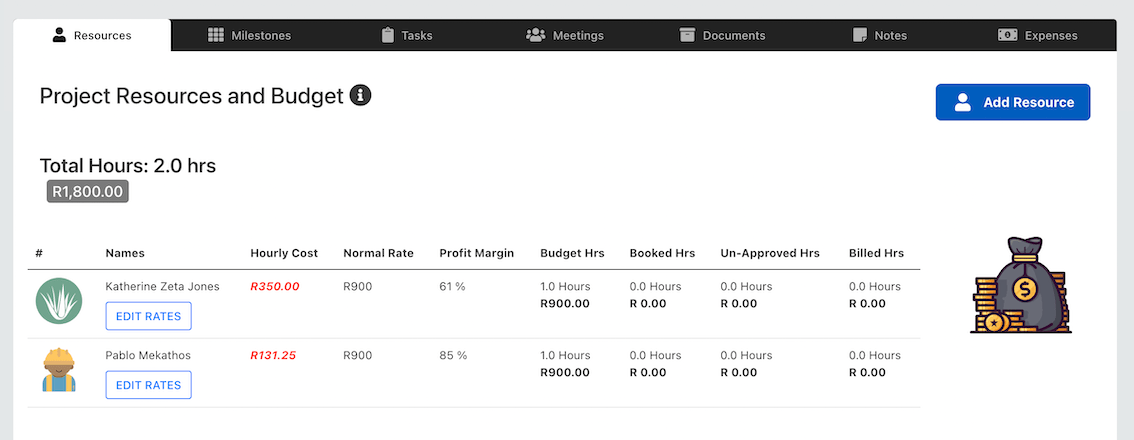
After entering the resources, you will be able to see their hours on the list. As employees book hours to projects, you will also be able to see the booked, approved and billed hours.
# Create Billing invoice
When your project has available billed and approved hours, you will see a "Bill XXhrs" button that will allow you to create an invoice for the client with just one click. When you click on that button, a new invoice is created.
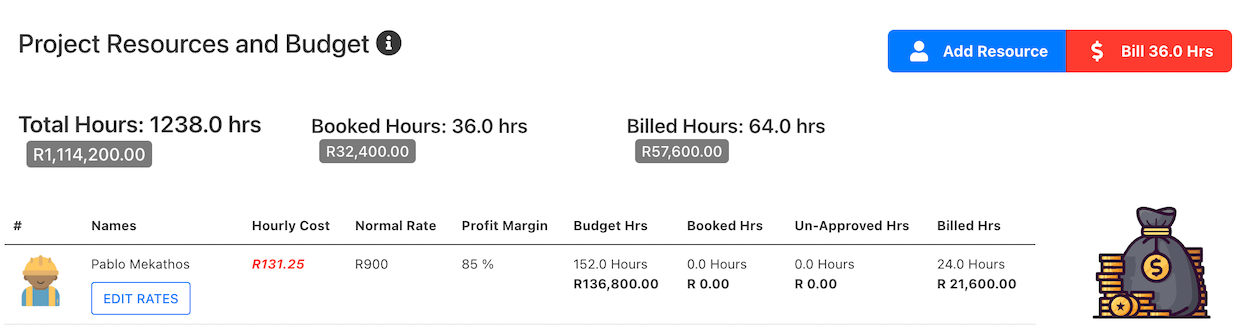
You will still need to ensure that the details on the invoice are correct and send the invoice to the client.
TIP
You will need Accounting App access to view the invoice created here.
# Project Accounts
In this section you can manage the accounts created for the project, you can also create new accounts. Accounts allow you to segregate cost centres for the project, in order to better manage and control project cost. There will be default accounts created, you can add new accounts or delete accounts you do not need.
TIP
When creating project expenses, you will need to assign these expenses to available project accounts.
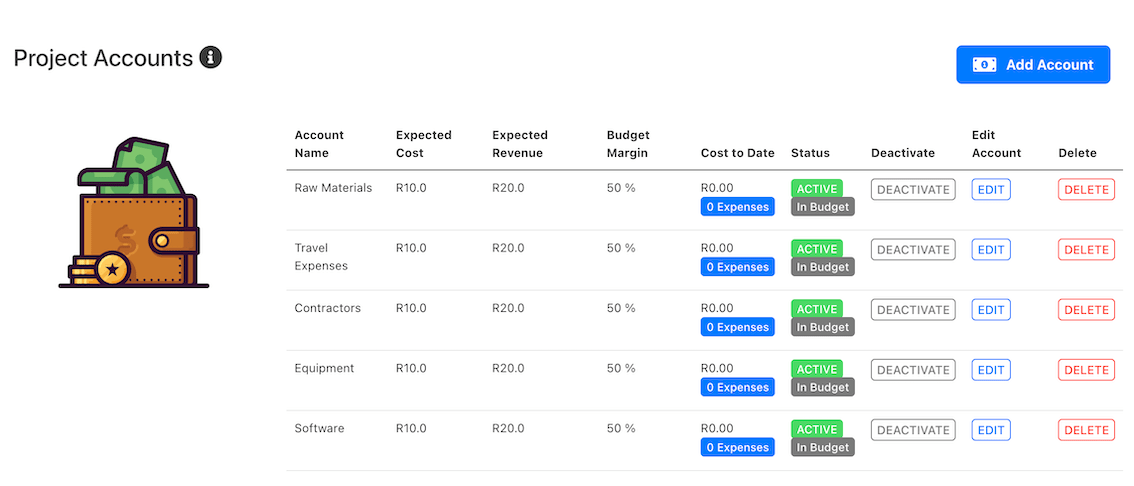
Edit Project Accounts You can edit accounts details before booking expenses to that account. You can change: (a) The name of the account, (b) The cost for the account and (c) expected revenue from the account.
Deactivate Project Accounts You can deactivate project accounts to stop expense bookings against the account.
Delete Project Account You can delete a project account, before booking expenses towards that account.
Account Value As people book expenses against accounts, you will be able to see the value of the account and can also tell if the account is over-budget.
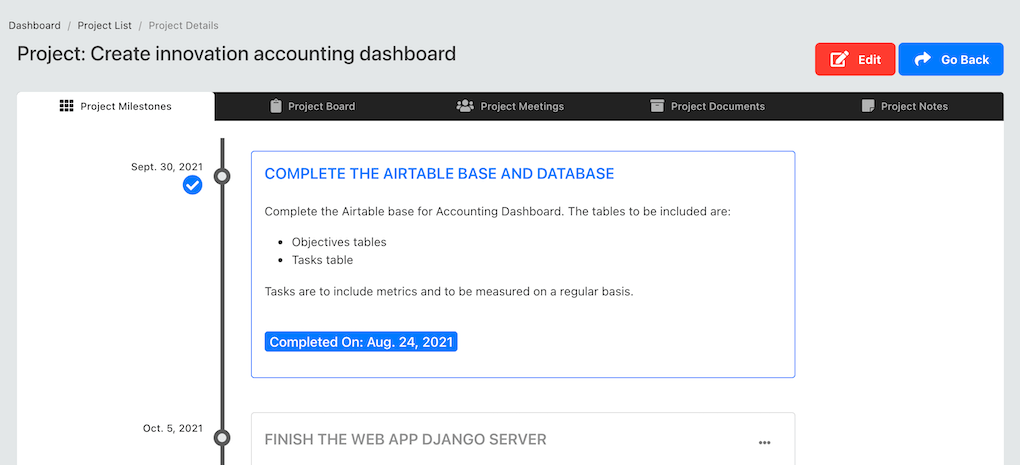
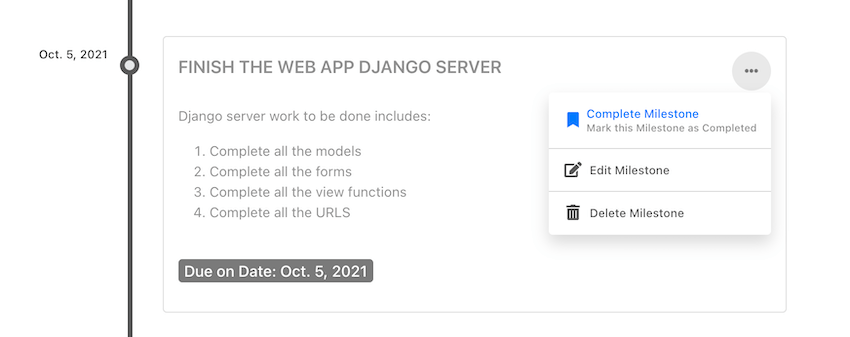
# Create Project Milestone
You can create a new project milestone by navigating to the end of the project milestone list, on the project milestone tab of detailed project page:

The following information must be provided to create a new milestone:
| Fields Required |
|---|
| Title of milestone |
| Milestone due date |
| Milestone description |
This information will be displayed back to you on the project detailed page. You will be able to: (1) edit the milestone (2) delete the milestone (3) move the milestone status to completed
To edit the milestone, click on the three dots at the top right of the milestone box, a dropdown menu will appear with option .
TIP
When a milestone is initially created, it will be greyed out. When you move it to completed, it will be blue.
It is advisable to use this milestone status functionality to let the team know what milestone they are currently busy with. Milestones are proxies for project stages.
# Project Task
You can also add tasks directly to project milestones from this page. Click on the "Add new task to this milestone" button to add a task. This button is only visible on milestones that are still in progress, before they are marked as completed.
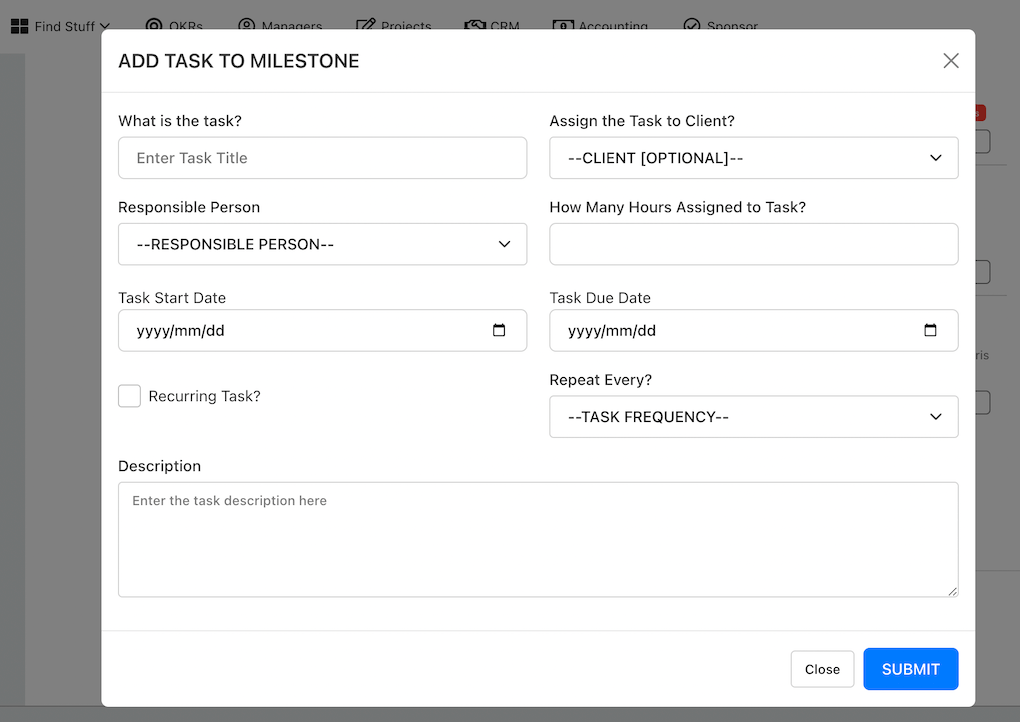
Enter all the required information and save the form.
TIP
Note that you will need to assign available hours to tasks at this stage. This is part of the project planning. The hours that you assign will be added to the project budget hours and your project team will be able to book time to these tasks.
WARNING
Before you add a task, you will need to first assign project resources. Read more about project resources in the "Project Resources" section above.
# Project Board
The project board is the place where all the tasks the project team members are currently busy with are shown. Tasks are divided in to three columns:
- TODO tasks
- In progress tasks
- Completed tasks
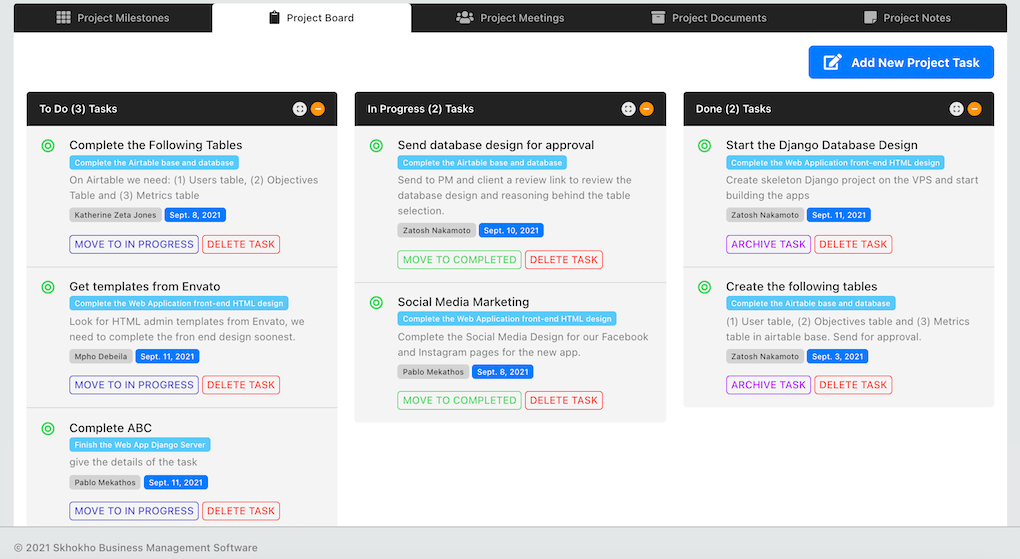
You can also move the tasks forward between the columns, for example - you can move a task which is in the "to-do" column to the "in progress" column by clicking on the button "move to in progress". You can also delete a task.
On the project board, within the task detail you can see:
- The Title of the task
- The project milestone associated with the task
- The person responsible for the task
- The due date of the task
There are two action buttons: (1) Move the task status and (2) delete a task.
WARNING
Anyone who has access to the project has the ability to create, move and delete tasks, only grant access to the right people.
# Create Project Task
At the top right corner of the project board, there is a button "add new project task".
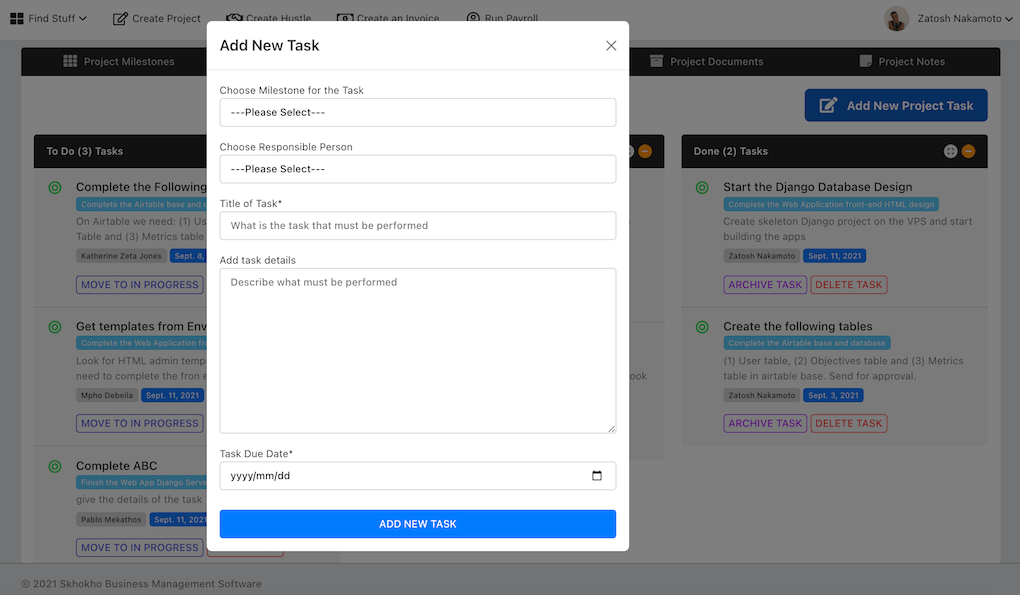
Click on the button, the information required to create a new task is:
| Fields to Create Task |
|---|
| Select the milestone |
| Select the responsible person |
| Title of the task |
| Short description of task |
| Due date of the task |
TIP
The tasks created here will also appear on the individual personal pages and calendar of the responsible person.
# Edit Project Task
Project and all other tasks cannot be edited, however details, documents and logs can be added to tasks. To add logs to tasks, click on the task name and you will be routed to the task detailed page.
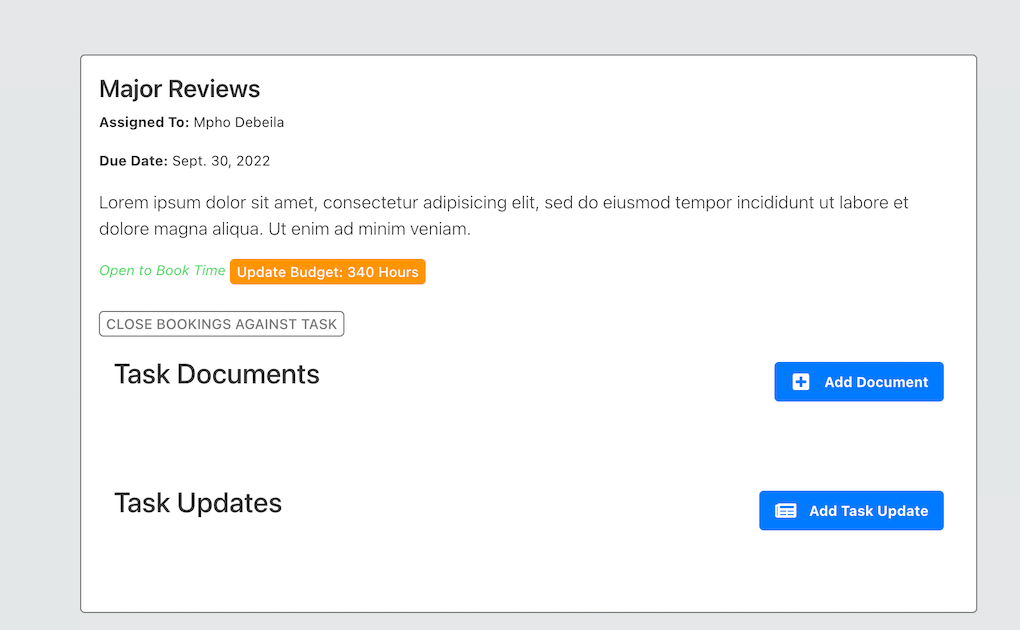
From the task detailed page you can:
- Add a document to the task
- Add an update to the task
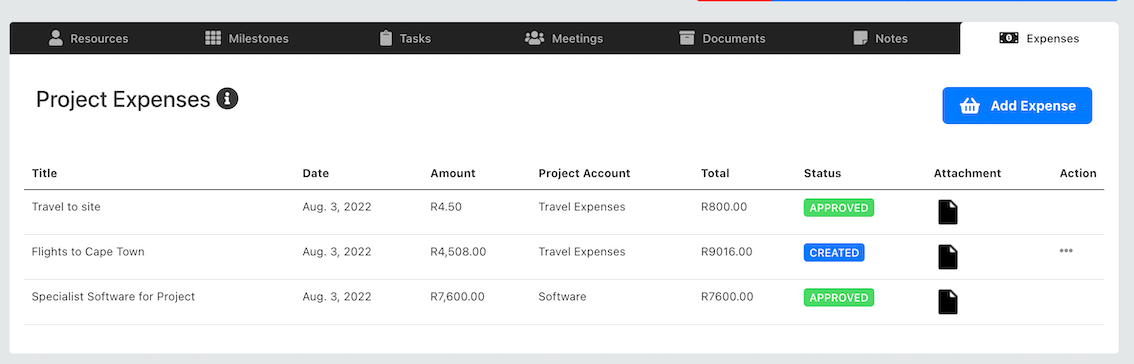
# Project Expenses
Project expenses are just like any other expense, except they will be assigned to a project account. Before you can create a project expense -- the project manager will need to create project accounts to book to.
To add a project expense, click on the "Add Expense" button at the top of the page:
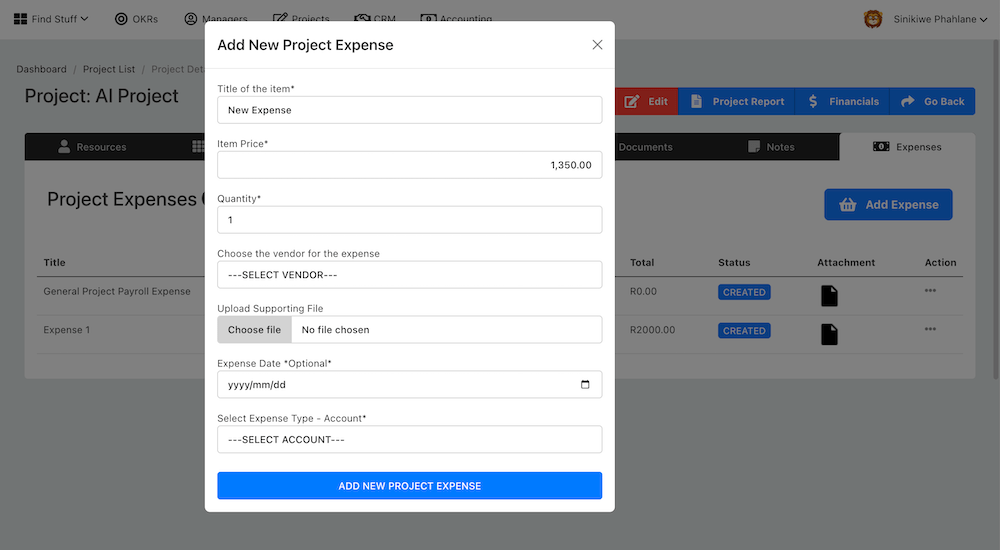
Enter the required information and save the form.
Once you create an expense, the project manager will need to approve the expense, only approved expenses will be booked against the project.