The ultimate guide to project finance tracking with Skhokho Project Management Software
Hey there! Are you tired of manually tracking your project finances and finding it hard to stay on budget? Skhokho Project Management Software has got you covered with its finance tracking feature! In this step-by-step guide, I'll walk you through how to use Skhokho to effectively track your project finances from start to finish. We'll be using screenshots and real-life examples to make the process as easy as possible for you.
Tracking project finances can be a tedious and time-consuming task, but it's essential for the success of your project. With Skhokho's finance tracking feature, you'll be able to stay on top of your project's financial health and make informed decisions about resource allocation and budget management. No more messy spreadsheets or missed deadlines due to poor financial tracking. In this guide, I'll show you how to use Skhokho to set up cost estimates, track hours and expenses, and monitor project progress in real-time. So sit back, grab a cup of coffee, and let's get started on streamlining your project finance tracking with Skhokho!
![]()
In this tutorial we will cover:
- How to set up a project execution plan
- How to set up a project resource plan
- Project budgets (resources and expenses)
- Regular progress reporting and project controls
- Project billing - invoicing the client
In each section, we will start with the theory and then demonstrate Skhokho project management tools with a real-life example. The project we will be working on is Design and Development of the Corporate Website for Kijima Construction Services.
Set up a project execution plan
Project Execution Plan (PEP) Theory and Origins
A Project Execution Plan (PEP) is a comprehensive document that outlines the strategy, resources, and methodology for executing a project. The PEP serves as a roadmap for the project team, providing direction and guidance to ensure the project stays on track and meets its objectives.
The origins of PEP can be traced back to the principles of project management, which has its roots in the late 19th and early 20th centuries. As the field of project management matured, it became clear that a comprehensive plan was needed to ensure the successful execution of complex projects. This led to the development of the PEP, which provides a framework for defining, organizing, and communicating all aspects of a project.
In practice, a PEP is used to guide the implementation of a project from start to finish. The PEP typically includes the following components:
- Project scope: Defines the boundaries of the project and what is included in its scope.
- Project objectives: Outlines the specific goals and outcomes that the project is intended to achieve.
- Project methodology: Specifies the approach that will be used to execute the project, including the tasks, milestones, and timeline.
- Resource requirements: Identifies the personnel, equipment, and other resources that are needed to complete the project.
- Budget and financing: Outlines the estimated costs of the project, including both direct and indirect expenses.
- Risk management: Identifies potential risks and outlines a plan for mitigating those risks.
- Performance monitoring: Specifies the metrics that will be used to track the progress of the project and measure its success.
For the project "Design and Development of the Corporate Website for Kijima Construction Services," the PEP would provide a detailed plan for the execution of the project, including the steps that will be taken to design, develop, and deploy the website. It would also outline the roles and responsibilities of the project team, the resources that will be needed, and the timeline for completion. The PEP would serve as a guide for the project team and ensure that the project stays on track and meets its objectives.
PEP Example - Design and Development of the Corporate Website for Kijima Construction Services
Follow along by executing the steps as you read, start by creating an account on Skhokho - ensure that you select at least Business Package or Business Pro package, to access project management features. You can create a free 14 day trial here: https://skhokho.io/authentication/register
Step 1: Navigate to the Project App and create a new project
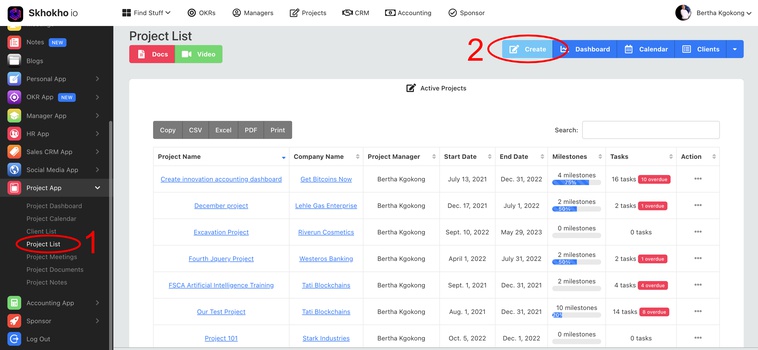
At this point, we are still doing high level planning, enter the following:
- Project Description
- Scope of Work
- Deliverables
Step 2: First Draft PEP
The first drat PEP is still incomplete, that is ok for this stage of the project. We will need to add project resources and do some high level scheduling to get a better view of our project. Enter all the information you have so far:
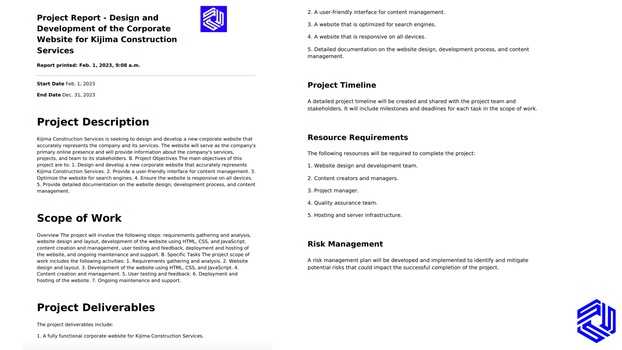
You can enter all this on the “Create Project Page” — Skhokho provides 2 high level titles, but you can add as much as you need to customise the project document to fit your individual needs. The next plan will be to work on the project timeline.
You need to define your deliverables in detail, in order to prepare a project timeline - each deliverable will need to be added to the timeline. Consider the required resources and available resources.
Navigate back to the project list and click on the new project you just created, you will now see this:
Project Resource Planning - Theory Insert
Project resource planning is the process of identifying and allocating the resources (e.g., personnel, equipment, materials, budget, etc.) needed to complete a project successfully. It is a critical component of project management and planning as it determines the feasibility of a project, helps to identify any potential risks, and ensures that the project has the necessary resources to achieve its goals.
In project resource planning, the project manager identifies the tasks required to complete the project, the resources needed to perform those tasks, and the timeline for their completion.
Project resource planning is a dynamic process that requires constant monitoring and adjustment. Project managers must continuously assess the resource utilization and adjust the resource plan as necessary to ensure that the project stays on track and meets its objectives. Effective project resource planning is critical to the success of a project and helps to ensure that the project is completed on time, within budget, and to the desired quality standards.
Step 3: Add project resources - people who will be working on the project (Resource Planning Stage 1)
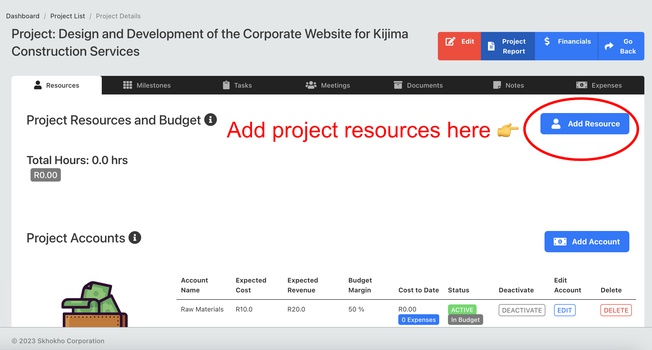
When you click on the “Add Resource Button” - you will be able to pick people from a drop-down list. Only individuals who have Project Access can be selected from the list. Add as many resources as you need for the project. You will assign tasks to them later - for now we are just making them available to work on the project.
You will need to enter: Hourly, overtime, weekend and holiday rates for every resource you add.
Note: When employees enter their timesheets, these rates you select here will be used to create billing invoices for the client. This is therefore the rates you charge the client for the hours of these resources, not the cost rates. The cost rates are defined by Human Resources from the HR app. Discuss with the HR department what the cost rates are for every individual in your project.
Resource hourly rates and project profitability
When assigning billing rates for individuals, you should consider both the cost rates and the required profitability per resource. Cost rates are the costs associated with each resource, including direct costs such as salary and indirect costs such as overhead and benefits. To determine the billing rate, project managers should add a margin to the cost rate that will cover the desired profit for the project.
The ideal margin for a project depends on a variety of factors, including the industry, the nature of the project, and the client's budget. Industry norms for project margins can range from 5% to 20% depending on the type of project and the industry. For example, projects in the construction industry typically have lower margins than projects in the software development industry.
When deciding on resource margins for a project, project managers should consider the project's objectives, the level of risk involved, and the desired level of profitability. They should also consider the client's budget and any constraints that may affect the project. It is important to find a balance between profitability and the cost of resources to ensure that the project is completed successfully and to the client's satisfaction.
In our project we ended up with the following rates:
Note - this margin indicated here does not include overheads, it is based only on the salary cost of the resource as calculated from the hourly cost rates of the resource. Consult with HR to ensure this rate is accurate.
Step 4: Project Accounts (Additional required resources)
The next step is to define project accounts. These are expense accounts that will have budgets and expenses - required to run the project. They could be anything from raw materials to travel expenses. There will be default accounts created when you land on this page for the first time. You can delete the ones you do not need, and add accounts you need for the project.
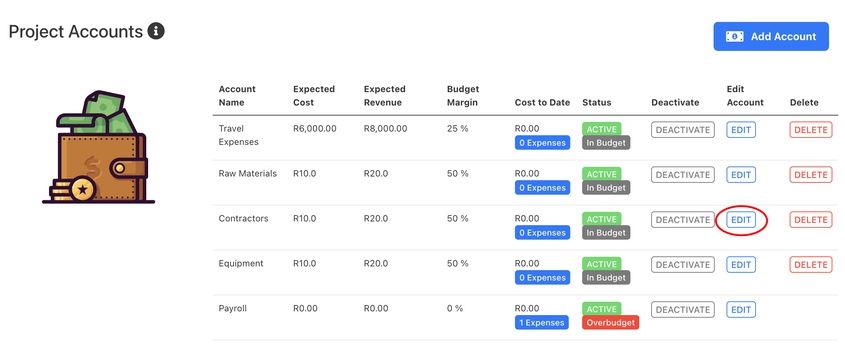
Edit Account - Enter the expected cost and expected revenue for the selected account. The system will calculate an account margin for you.
Note: Individuals will be able to book project expenses to these accounts over the lifecycle of the project, as the project manager - you can deactivate the account at any time.
Step 5 - Project Tasks - assign resources and timelines
At this stage we can now add project milestones and tasks to the project. We will be working with the following definitions:
Project Milestones - High level deliverables, as described in your Project Execution Plan. At this stage, we will be adding dates to these deliverables.
Project Tasks - Individual tasks that must be completed by a resource to push the needle on the milestones described above. Each task will be assigned to one individual, and an estimate of hours required to complete that task will also be provided.
Click on the Milestones Tab - and add a new milestone.
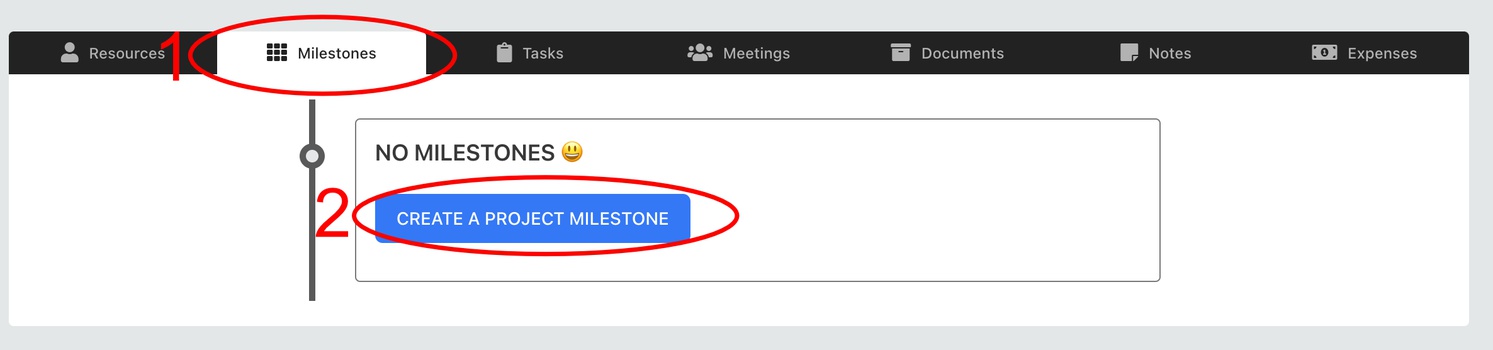
The milestones we will go with are:
- Project Kickoff: This is the first milestone in the project where the project team is assembled and the project objectives and goals are defined. The project sponsor and stakeholders will review the project plan and provide feedback and approvals.
- Requirements Gathering: This milestone involves gathering the requirements for the website from Kijima Construction Services. This will include the design, content, and functionality that is required. The project team will also determine any necessary resources, budget, and timeline.
- Design Approval: This milestone involves the approval of the website design by Kijima Construction Services. The project team will present the website design and receive feedback and approvals.
- Development: This milestone involves the development of the website. The project team will work on the coding, testing, and debugging of the website. This will also include the implementation of any necessary features and functionalities.
- User Acceptance Testing: This milestone involves the testing of the website by Kijima Construction Services. The project team will provide training to the users and receive feedback on the functionality and design of the website.
- Deployment: This milestone involves the deployment of the website. The project team will work on the migration of the website to the production environment and make any necessary updates to the website.
- Post-Deployment Review: This is the final milestone in the project. The project team will review the performance of the website and receive feedback from Kijima Construction Services. Any necessary updates will be made to the website to ensure it meets their requirements and expectations.
For each milestone - follow the process to create a record on Skhokho, paying close attention to the delivery times of the milestones. Only the due-dates are specified per milestone.
Once you have created the milestones, you can now click on the “Add New Task To Milestone” button to add a new task.
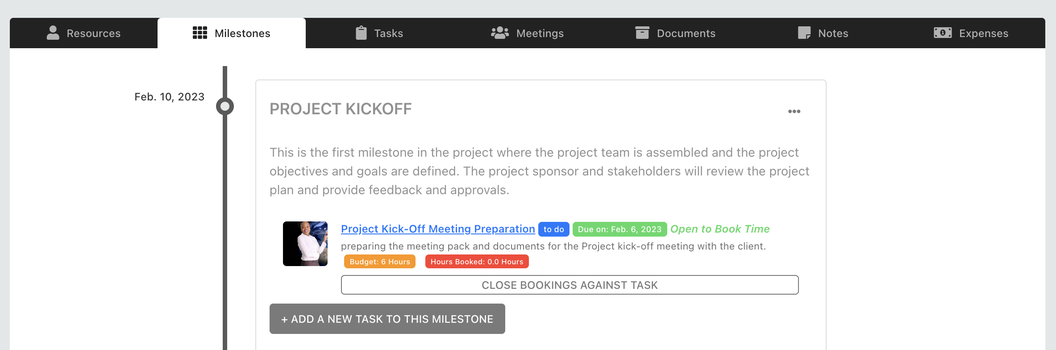
You can select the project resource to add to the task - this list will come from the resource list already created. Very important at this stage to specify the available and budget hours for the task.
When employees submit their timesheets - the hours specified here will be available for booking, in addition - only resources you added here will be able to book time to this task.
Continue to review budget hours and project resource financials
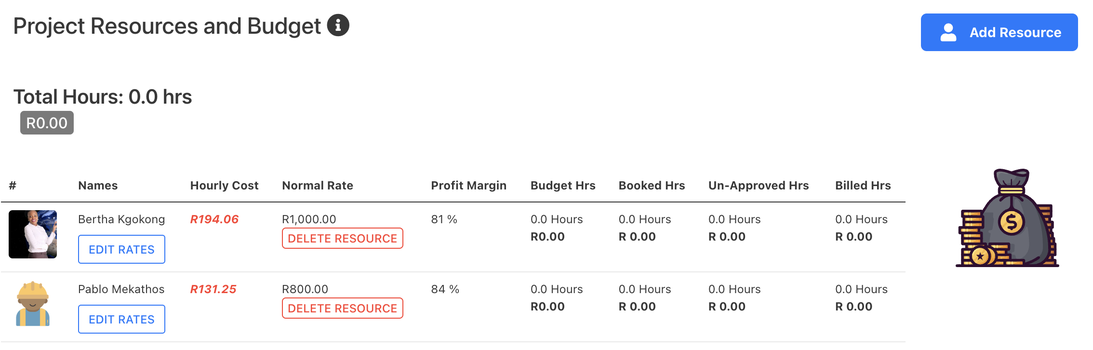
As you add more tasks and assign resources to them – the resource table we created in Step 3 above will start to look different.
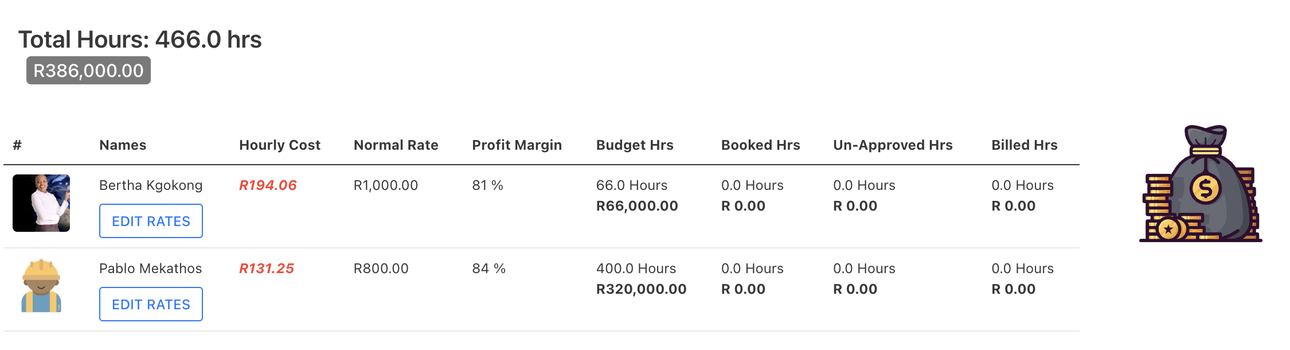
The rates and margins do not change.
The budget hour column gets updated as you add more tasks with hours associated. According to this table above: Bertha has now 66 hours assigned to her and Pablo has 400 hours assigned. None of them have booked any hours, hence no bills have been produced.
You will also be able to see the total budget revenue for the project, based on the hours.
Project Billing and Creating Project Invoices
Employees will book time to the project, the timesheets will get approved and as the project manage - you get a one-click-button that allows you to create an invoice from the available hours.
Timesheet management will be covered in a separate tutorial - FFWD ahead, employees have submitted some timesheets, some of which were approved.
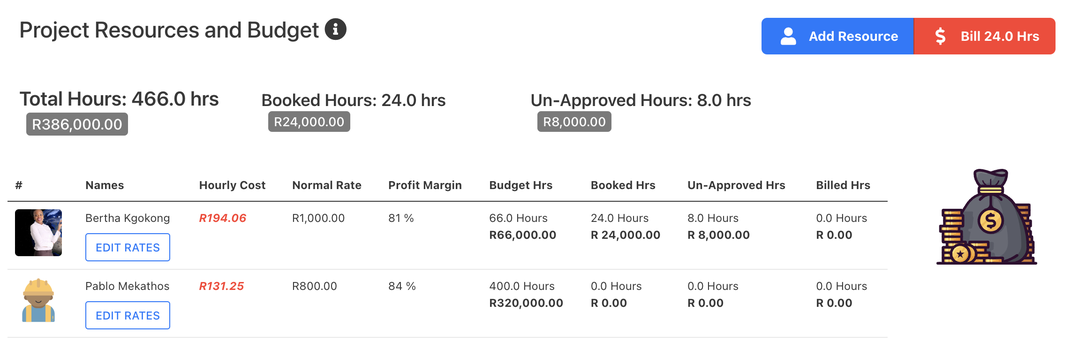
According to this above:
24 hours have been approved worth R24 000
8 hours has not yet been approved.
The project manager can create an invoice at anytime from the approved hours that have not yet been billed by clicking on the “Bill 24hrs” button above. The invoice will be created automatically in the accounting app of Skhokho.
Track Project Financials
Over time you can use the following to track project financials:
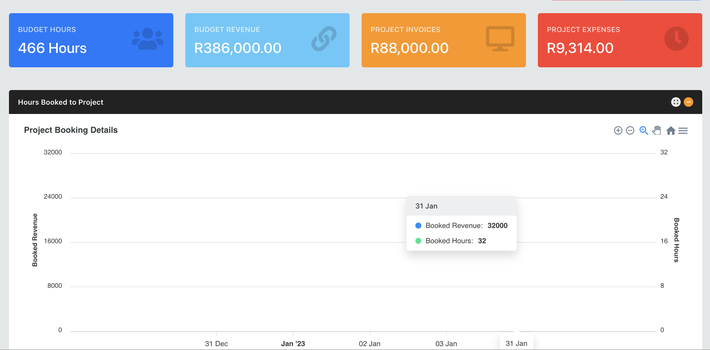
The resource matrix - review the budge versus the actuals and billing
Project Financials dashboard and report - At the top of the page, use the “financials” button to view the project financials. It will update on a monthly basis to show the following: Hours and revenue booked per month, booked hours versus budget hours on a monthly basis, project invoices versus project expenses on a monthly basis.
Final Words
In future tutorials we will cover more things that you can do from your project management dashboard which include:
Creating project notes, project meetings and project documents. In the meantime, sign up for Skhokho Project Management App and check out the project financial controls features, leave us a comment and your thoughts.


